SSL certificate helps to encrypt the connection between the 2 connection point so the data is transmitted over the channel as a series of random encrypted code instead of the plain text, this helps to avoid the data being tampered to retrieve the content.
SSL certificate is widely being used by website especially for website that accept ecommerce payment or have any login form that will serve to protect the password being sent to the server.
Nowadays, as email communication has also being adopted to have SSL setup as to protect the sensitive email content from being hijacked. This is important as emails are being access commonly via public Wifi / Hotspot.
Without enabling SSL/TLS and HTTPS for your SmarterMail mail server, your end user’s login credentials are being transmitted in plain text (which refers to when they check their mails on this network, their password are being seen in full instead of being encrypted.
You can obtain your SSL Certificate from a 3rd party SSL provider. If you renew your support maintenance / purchase your SmarterMail license with us, you will receive a complimentary of 1 year of SSL certificate.
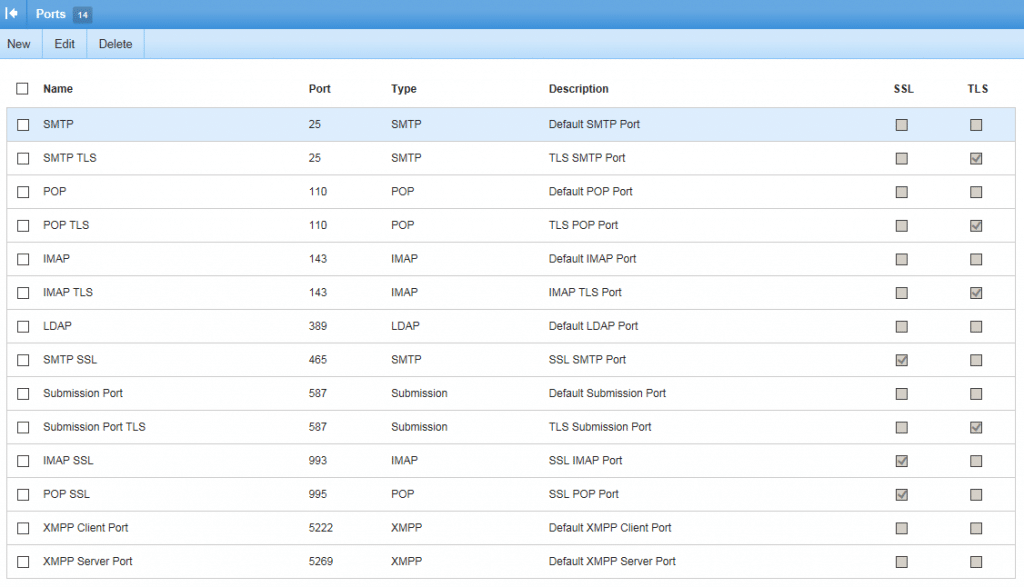
Some important message to be aware between SSL/TLS : TLS will encrypt once the STARTTLS command is sent. TLS will need to be set up over port 25, 110, 143 and SSL over ports 465, 993, and 995.
Which SSL certificate should you purchase
There are few different type of SSL certificate available – Domain Validated (DV), Organization Validated (OV), and Extensive Validated (EV Green Bar Address). Each of the SSL have it’s own differentiation.
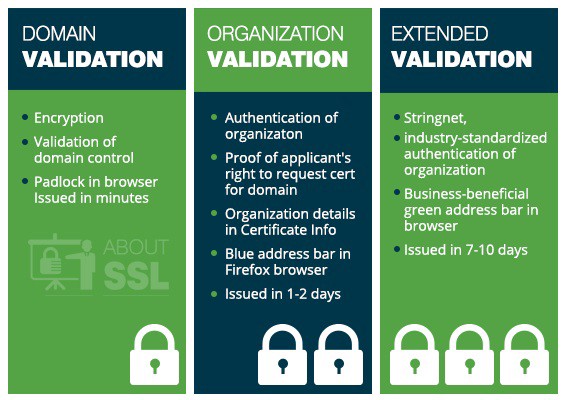
Domain Validated SSL – The most entry basis of the HTTPS SSL. Fast issuance – usually within 10-15 minutes as the validation can be done with confirmation of validation via email.
Organization Validated SSL – Additional validation such as business name, address and phone number will be required. Takes a little more time – usually 3-7 days for validation to complete depending on the satisfaction of the information received by the Certificate Authority (CA). The name of the organization will be included as part of the SSL when it’s being looked up.
Extended Validation SSL – The validation process almost similarly to OV SSL. The one thing different from OV is the organization name of the SSL will appear on the address bar when the site is loaded on the browser.
For most cases, a DV SSL is sufficient for the usage of the purpose of enabling SSL for your SmarterMail.
We recommend if you are purchasing the SSL from a 3rd party provider, get the SSL for the max 2 years. That will get you some extra dollar of savings + reduce the hassle of the needs to renew and reinstall the SSL every year. With 2 years of SSL validity, you will just need to do it once every 2 years instead of every year (which typically most of the times you will tend to forget to renew the SSL!).
Before buying the SSL, you will need to decide a hostname.
The SSL certificate needs a hostname. Just like you are enabling HTTPS for your website – your website domain name is the hostname.
Typically, for SmarterMail or any kind of mail server, most common hostname being used are webmail.yourdomain.com / secure.yourdomain.com / smtp.yourdomain.com / mail.yourdomain.com ..etc
It depends on your environment.
If you are running a hosting business and the mail server is a shared hosting mail server which also being used by your resellers + shared hosting clients, you will want to get a more common hostname for the usage for white label purpose (we will explain why below). Otherwise, using anything of the example above such as mail.yourdomain.com for your own business usage is just fine.
There are 4 parts involved for the SSL usage in your SmarterMail:
- The webmail access – the URL to login to check emails via browser. If it’s your brand URL, your resellers may not like it as it expose your brand identity to their end customers.
- The hostname of your SmarterMail server – typically this will be use for communicating with the external mail server for delivery and receiving of emails.
- The actual SSL TLS for your SmarterMail protocol – IMAP/SMTP/POP
- ActiveSync – Exchange Activesync allowing your end users to sync mails between their mobile/tablet and the webmail. Required separate licensing for activation.
To make some extra saving of costs and easier maintenance, we recommend choosing 1 hostname for the usage for the above 4 functionality, ie secure.domain.com.
Using a different hostname for your SSL hostname may also trigger errors on some external mail server to reject your mails due to unmatched of SSL certificate name.
Is there way to allow multiple SSL on different domain in SmarterMail
At certain point of time, which typically happens if you are running a hosted enterprise mail service for your end users, there might be users that needs to use their own SSL instead of using your common general common hostname SSL.
The good thing on SmarterMail is you can have 2 ways to come go around this kind of request.
- Use a UCC SAN type of SSL certificate (which also will be either DV, OV or EV SSL). A UCC SAN SSL certificate typically allow you to add more different domain name on the same SSL certificate, ie secure.domainA.com, secure.domainB.com..etc. You will just need to add the hostname or domain in as it’s required and reinstall / replace the SSL on your SmarterMail server.
- The 2nd options will be to purchase a single SSL for each of the domain name and enable it on your SmarterMail. This will required a dedicated IP added to your SmarterMail and assign this to that customer domain (detail steps below).
Getting your SSL ready
Prior to configuring SmarterMail to be secured over SSL or TLS, the SSL certificate installed on the server must first be exported to a Base-64 Encoded certificate that is readable by SmarterMail. The installation on the certificate on your IIS server varies depending on which version of Windows server you are running.
Follow these steps to export your SSL certificate to a Base-64 encoded certificate file once you have the certificate installed:
- Sign into the Windows server in which SmarterMail is installed
- Click Start, select Run
- Type MMC, press enter.
- Navigate to File -> Add\Remove Snap ins
- In the available snap-ins column select Certificates and hit Add
- A new window will appear, choose Computer account and hit next.
- Ensure local computer is selected and hit finish.
- Now there will be a certificate tree view, expand Personal, and choose certificates.
- Right click the certificate in which you wish to export -> All Tasks -> Export.
- A new window will appear, hit next.
- Do not export private key’s -> Next
- Save as a base64 x509 .cer file -> Next
- Choose a save location such as C:\SmarterMail\Certificates\<SiteName> – Give a name for the certificate -> Save.
Applies to SmarterMail v8 to v15
IMPORTANT: The version you are running has been classified as legacy version by SmarterTools. There will be no support with any security hotfix or patches release if your installation runs into any troubles.
Consider upgrade your version to the latest release to stay up-to-date and ride on the latest features and technology for your end users to increase their productivity. Leave us a message with your SmarterMail license key if your support maintenance has expired together with your contact email and we will get back to you with a special discount
Follow these steps to add a port to listen over SSL or TLS:
- Log in to SmarterMail as the system administrator.
- Click the Settings icon.
- Expand the Bindings folder and click Ports in the navigation pane.
- Click New in the content pane toolbar. A popup window will display.
- Complete the following required fields: Protocol, Encryption (SSL or TLS), Name, Port and Certificate Path. All other fields are optional.
- Click Verify Certificate in the lower right corner of the popup window to ensure the certificate exists in the specified path.
- Click Save.
NOTE: Using similar steps as above, modify your existing port 25 to be encrypted with SSL or TLS.
Once you have added SSL to a port, you can follow the instructions below to add the port to listen on an IP:
- Log in to SmarterMail as the system administrator.
- Click the Settings icon.
- Expand the Bindings folder and click IP Addresses in the navigation pane.
- Select desired IP address and click Edit.
- Use the checkboxes to select the port(s) you would like the IP address to listen on.
- Click Save
If you are setting up different SSL with a dedicated IP assigned to your customer’s domain with their own hostname repeat the above steps and change the listening IP for the domain (by editing the domain property) to the assigned dedicated IP.
Applies to SmarterMail v16 and v17
- Login to your SmarterMail as the admin
- Click on the Settings > Bindings as indicated below
- You will see both IP Addresses and Ports tab on your right panel.
- Click New in the content pane.
- Complete the following required fields: Protocol, Encryption (SSL or TLS), Name, Port, Certificate Path and password. All other fields are optional.
- Select the IP Address for the port to listen on.
- Click Save.
On any of version of SmarterMail you are using, make an attempt to restart your SmarterMail service as to make sure it pick up the changes.